Love truly is the essence of our lives and needs to be celebrated EVERY day in EVERY way!
I am sure by now you all know how much I love being grandma and having our Juliana's first Valentine is yet another opportunity to have fun, shower her with love and count my blessings. Of course, how do we quilters express all those emotions the best? - by making something! :)
Halt everything else, it is time to make sweet Valentine for my sweet little girl!
When I saw a mini-charm pack of Moda's Kiss, Kiss! collection in my local quilt shop it was just so cute and I had to have it... and I am not even a charm (or mini-charm!) kinda person!! So I just played with those perfectly cut (I can see how one can get used to this!), little squares until I had a HEART...
At first I picked only red and pink squares, but then I liked just a touch of that beautiful blue in there! Agree?
Now on to sew these 49 little gems together!
Here is how I do these things to stay in order and somewhat organized. I sewed them in vertical pairs, using chain-piecing - so I flip the right most vertical column onto the next one and start sewing from the top:
Here are three columns of pairs and I had one leftover since it is a odd number.
I also take those "chained" pieces to my ironing board and, in order to have opposing seams later (to match the seams perfectly), I lay the chain on the board and flip every other one, like this:
That way, as I open each top fabric and press, my seams will be opposing. Does that make sense to you?
One gets opened up...
The next one down...
Uh, oh... that ironing board cover looks dirty, but honestly it is just some staining that happened once I pressed some fabric from Africa that my daughter brought for me...It is actually CLEAN. :)
OK, so here are my pairs all pressed and plus that one, odd row:
Now I flip the pair onto another pair (left part) and the odd row onto the third row of pairs. Here pins are necessary to keep everything in place...
So once I sewed that and joined two parts together, here is my chained piece!! At this point you can't make a mistake any more, since they are all connected! Now just to join the rows together:
And with those opposing seams, it was really a breeze, and NO PINS!!
Once I had that done, I wanted it turned "on-point" so choosing the fabric for that was the next order of fun!!
This print (Moda's "Flirt" collection) was my first thought:
Or beautiful print from AGF's Recollection line?
Or go with just solid, soft pink...lighter or darker?
I really liked how heart stands out on the solid, but liked BOTH shades of it, so here is a way to use both?
YUP - that was THE one!!
Now on to choosing thread colors for quilting - fun never ends for us quilters, does it??
Juts look at these Aurifil beauties!!
I went with the darker pink (kinda coral) color for the middle heart part and then switched to that whisper-light pink (I love that one so much!!), for the solid pink part...
Since prints hide quilting so well, here is the back. At this point it was after midnight and I was running out of steam...so stopped here for the day...
But, bright and early next day, the fun continues!! :)
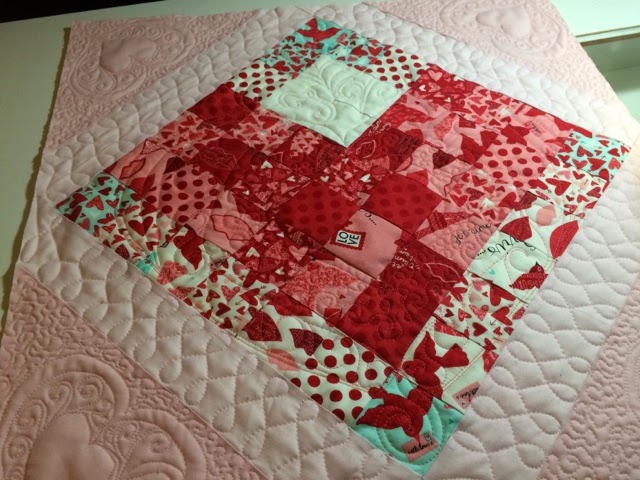
In the corners I wanted a heart, a nice one - so I cut one out of paper and used it as a template to trace lightly and then go from there... Followed the traced line - that was HARD for me!! But every time there is a chance to try something new and challenge myself - I learn something new, yay!!
So this was the FIRST of the four corners done... definitely room for improvement!!
Next one - better!!
These guys were done free-hand but with little 1" marks on the edge of the strip (can you see them?) and that was really what helped to stay somewhat uniform!
Tried my hand in grand baby's initials too - not the best, but ok!
So here it is - ALL DONE!!
Binding time!!
That little touch of blue gave me the chance to use some blue in my faux piped binding and I just LOVE how colors work together!! Have you tried this kind of binding?? It is so much fun and not at all difficult! This is not my idea and there are many tutorials out there, just Google "faux piped binding"!
But basically, you choose tow colors and instead cutting one width for binding (usually 2 1/4" or 2 1/2" wide strips), you cut your main color strip at 1 1/2" wide (red one here) and your "piping" color strip at 1 3/4" wide (teal) and then join them together lengthwise to get your binding strip (you will have a 2 3/4" wide strip).
Once you press it as you would normally do, because one color is wider, it will "peek" from the fold!
And then you just go on to use it as you would normally do any binding!
What I love with this is also that once you are doing your final stitching of the binding, as long as you stay in the "ditch" between the two colors - your thread is almost invisible!!
ALL DONE!!
I made this into a pillow cover (it is 20" square), so here is the back:
OOOH but wait!!! The afterthought... I got the idea to have a little pocket on the back, so that I can stick in a little note, a Valentine card, a book I also got for her.... Oh my - what is one to do??
Well, even though I should have thought of this before, I wasn't giving up!! Made a pocket, pinned the living daylights out of it to the back (used my little cutting board under that top layer for easy pinning)...
...and then there was some major wrangling of that pillow cover, with the free-arm on my machine...
...but I DID IT!!! hoorayyyy!!!!
I love, love, love my little Valentine!!!
And I can''t wait to kiss that little cutie and give her all of this!!
Wishing you all love and joy,
Marija
PS - Marley says - good job mom, now lets go for a walk!! :)